|
Configuring WebTrends Log Analyzer
to work with your Virtual Private Servers is simple and easy. The
directions below are based on version 3.0d of WebTrends, but they
should apply to other versions of WebTrends, as well as Virtual
WebTrends.
For each log
file you want to analyze with WebTrends, you need to define a log
profile so that WebTrends can properly process the log. WebTrends
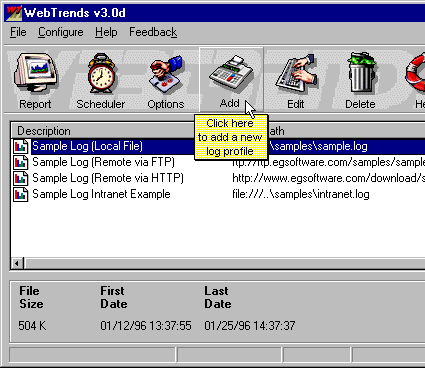
has several predefined sample log profiles which are visible in
the main window of the program. Each one is titled "Sample Log..."
and refer to sample log files included with the software or located
at the WebTrends FTP site.
To create a
new log profile for your Virtual Private Servers's log files, do the following:
- Click the
Add button on the WebTrends toolbar.

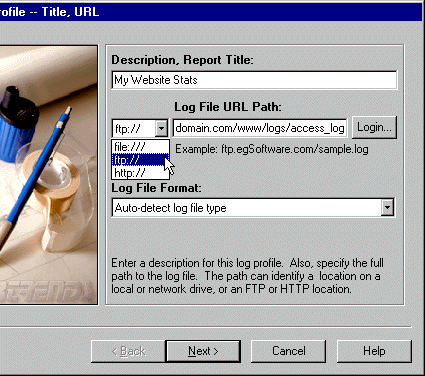
- The Add Log Profile -- Title,
URL dialog box will appear. In the Description, Report Title
field enter a title/description for your log profile. In the Log File URL Path
designate ftp:// as the transfer protocol and enter the
domain name of your Virtual Private Servers and the path and filename of
your virtual web server's access log file. Click the Login...
button (the Details... button in Virtual WebTrends) and
enter your Virtual Private Servers's login name and password. Set the Log
File Format to be Auto-detect log file type.
Click the Next > button to continue.

Your WebTrends
is now configured to contact your Virtual Private Servers via FTP and
download your web server's transfer log file. WebTrends supports
log file download via HTTP, but FTP is easier to work with.
WebTrends will automatically detect the format of your web server's
log files.
- In the next
dialog box, Add Log Profile -- DNS
Lookup, set WebTrends to lookup IP addresses Automatically.
If your web server is not currently doing reverse DNS lookups
on the IP addresses it is logging, WebTrends will now do the lookups
for you, so that your statistical reports will include the domain
names of servers accessing your web site. Click the Next >
button to continue.
- The Add Log Profile -- Home Page
dialog box will appear next. In the Home Page Directory
fields select http:// as the transfer protocol and enter
your Virtual Private Servers's domain name in the text field, followed
by a "/". It is not necessary to enter a Login.... In the
Home Page field enter your Virtual Private Servers's home
page, which will probably be index.html. Click the Next >
button to continue.

The statistical
report generated by WebTrends will include links back to pages
at your web site, using the information above.
- You can just
click the Next > button in the Add Log Profile -- Filters
dialog box, since it is not necessary to setup any filters for
normal operation of WebTrends. Click the Next >
button to continue.
- In the Add Log Profile -- Database and Real-Time
dialog box, click the Finish button to complete the addition
of the new log profile. This dialog box will not appear if you
are using Virtual WebTrends.
WebTrends is
now configured to download your web server logfile and generate
a statistical report of the traffic at your website. To create a
statistical report of your Virtual web server traffic, do the following:
- Click the
Report button on the WebTrends toolbar.

- Choose which
type of report you want to generate from the Memorized Report Name
drop down menu in the Create Report dialog box which
will appear.

Each of
the predefined report types contain different information about
your Virtual web server traffic. You may want to start by viewing
the Quick Summary report to get an idea of what
a predefined report contains. If you are using Virtual WebTrends
you will not have these predefined report types.
- Click on
the Start button to generate the report.
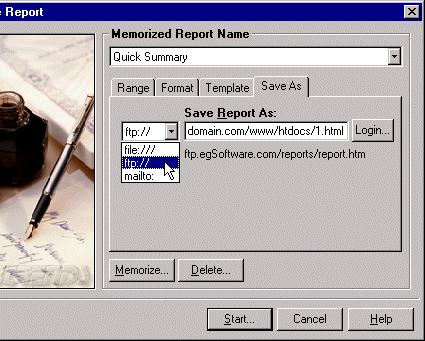
- Unless you
specify otherwise, WebTrends will place the complete report on
your PC. To setup the WebTrends to place the report on your website,
click the Save As tab, choose ftp:// as the
transfer protocol, and enter your Virtual Private Servers domain name and
the path to the destination file in the text field.

- Click the
Memorize... button to save the new report setup.
|


